

A proper rabbit cage setup ensures safety, comfort, and day-to-day well-being for your rabbit.
I have built and tested many rabbit homes over the years. This rabbit cage setup guide draws on hands-on experience, vets’ best practices, and clear, easy steps you can follow. You will learn how to pick the right cage, set safe bedding and flooring, arrange toys and hideouts, and keep the space clean and healthy. Read on for a complete, practical rabbit cage setup guide that saves time and keeps your rabbit happy.
Why a good rabbit cage setup guide matters
A good rabbit cage setup guide helps you avoid common mistakes. It protects your rabbit from injury and stress. A well-planned cage supports health, digestion, and normal behavior. This guide explains key choices in clear steps so you can create a safe and joyful home.

Choosing the right cage size and type
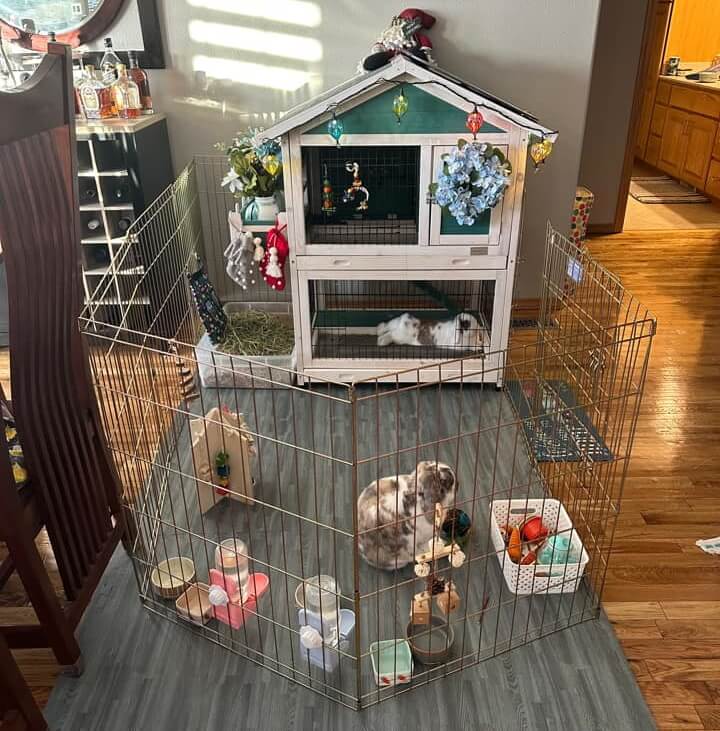
Rabbits need room to move. Minimum space for one rabbit is a large pen plus time outside. Cages that are too small cause stress and muscle loss. Pick a cage or pen that lets your rabbit hop, stand on hind legs, and stretch fully.
Things to consider when choosing:
- Size: Aim for at least four times the rabbit’s stretched length for the main living area.
- Type: Solid-sided pens, wire cages with solid floors, and modular pens all work when sized correctly.
- Indoor versus outdoor: Indoor setups keep rabbits safer from predators and weather.
- Multi-level cages: Use with caution; large jumps can injure rabbits.
From my experience, a wide playpen gives more freedom than a tall cage. My rabbits were calmer with space to run than with extra levels.

Flooring and bedding: comfort and hygiene
Flooring affects feet, fur, and cleaning. Wire floors can hurt feet if used alone. Solid floors with soft, absorbent bedding are best. Swap bedding often to control odor and keep the space dry.
Recommended flooring and bedding choices:
- Solid floor: Plywood or plastic base covered with bedding.
- Bedding: Paper-based or hay-friendly products that absorb moisture.
- Litter box: Use rabbit-safe litter like paper pellets or kiln-dried wood pellets in a corner box.
- Avoid: Clay clumping cat litters and cedar or pine shavings with strong oils.
I learned to line a litter box with pellets and place hay nearby. This trained my rabbits to use the box quickly and kept cleaning time low.
Layout and essential accessories for a happy rabbit
A good layout offers places to eat, sleep, hide, and play. Rabbits need toys, chew items, and a safe hideout. A tidy layout reduces stress and keeps teeth in check.
Must-have items for your cage:
- Hay feeder: Constant access to fresh hay for digestion and teeth.
- Water bottle or bowl: Heavy bowl reduces spills; change water daily.
- Litter box: Placed in a corner they prefer; add a small amount of hay on top.
- Hideout: A box or tunnel to feel safe.
- Chew toys: Untreated wood, willow, or safe commercial toys.
- Soft resting pad: For comfort on cooler floors.
Place food and water away from bedding that gets dirty. I keep hay racks above the litter box edge so hay stays clean and my rabbits still use the box.
 ventilation, and temperature control”
style=”max-width: 100%; height: auto; border: 2px solid black; border-radius: 10px; display: block; margin: 0 auto;”
loading=”lazy”
/>
Safety, ventilation, and temperature control
Safety keeps your rabbit healthy and calm. Good ventilation prevents dampness and respiratory issues. Rabbits do best in cool to moderate temperatures.
Safety and environment tips:
- Ventilation: Provide airflow without drafts directly on the rabbit.
- Temperature: Keep between 60°F and 70°F when possible. Avoid heat above 80°F.
- Escape and predator proofing: Secure latches, sturdy walls, and safe indoor placement.
- Electrical cords: Hide or cover cords to stop chewing accidents.
- Toxins: Keep plants, cleaners, and chemicals away from the cage.
Once, I found a rabbit chewing a cord behind a cage. I now route cords behind a heavy barrier and use cable covers for safety.
Cleaning and maintenance routine
A clean cage prevents disease and keeps smells low. Set a daily, weekly, and monthly plan. Consistency makes life easier and keeps rabbits healthy.
Suggested routine:
- Daily: Scoop soiled litter, refresh water, check food, and remove fresh droppings.
- Weekly: Replace bedding, clean surfaces with pet-safe cleaner, wash bowls and toys.
- Monthly: Deep clean entire cage. Disinfect with a diluted pet-safe disinfectant, then rinse and dry.
- Monitor: Watch for fleas, mites, and unusual behavior.
I follow a short daily routine that takes ten minutes. The weekly deep clean takes longer but keeps my rabbits bright and active.
DIY upgrades and common mistakes to avoid
Small upgrades improve comfort and function. Avoid mistakes that can harm your rabbit or reduce quality of life. This section shows easy fixes and pitfalls.
Useful DIY upgrades:
- Raised ramps with grip for safe access between platforms.
- Hide boxes with cutouts that match rabbit size.
- Removable tray liners for quick cleaning.
- Cable covers and corner protectors for safety.
Common mistakes:
- Using cages that are too small for long-term housing.
- Choosing bedding that smells strong or clumps.
- Letting rabbits chew untreated wood that has paint or glue.
- Neglecting supervised playtime outside the cage.
My biggest mistake was short housing time in a small cage. After switching to a larger pen with daily out-of-cage time, my rabbits became more active and social.
Frequently Asked Questions of rabbit cage setup guide
How big should a rabbit cage be?
A rabbit cage setup guide recommends as much floor space as possible. For one rabbit, aim for a large pen where the rabbit can hop at least three to four times.
Can rabbits live full-time in a cage?
Rabbits should not be confined to a small cage full-time. Use a large pen and give daily supervised free-roam time for exercise and mental health.
What bedding is best for a rabbit cage setup guide?
Paper-based or kiln-dried wood pellets are safe and absorbent. Avoid cedar and strong aromatic woods that can harm the rabbit’s lungs.
How often should I clean the rabbit cage?
Scoop the litter daily, change bedding weekly, and do a deep clean monthly. A regular routine keeps odors down and prevents disease.
Are wire floors safe for rabbits?
Wire floors alone can lead to sore hocks. Use solid flooring or provide mats and resting areas to protect feet and promote comfort.
Can I use a water bottle or a bowl?
Both work. Many rabbits prefer a heavy bowl because it is easier to drink from, but bottles save spills. Clean whichever you use daily.
Conclusion
This rabbit cage setup guide gives clear steps to pick the right size, choose safe bedding, design a practical layout, and keep your rabbit healthy. Start small by improving one thing today: add a hideout, swap to better bedding, or expand space with a pen. Your rabbit will thank you with brighter behavior and better health. Try one change this week, watch the results, and share what worked or ask questions below to learn more.
